Step 1: Make sure you have an email account and a credit/debit card.
Step 2: Go to https://www.namecheap.com and create a namecheap account. (create a username, password, and enter in your personal information)
Step 3: Go to "domains" then "domain name search" and purchase a domain name of your choice.

Step 4: Go to https://portal.aws.amazon.com/billing/signup#/start and create an AWS account. Select your preferences and enter in your personal info. Then click "sign in to console" and sign into your new AWS account.
Step 5: Go to "services" and search "route 53" then click "hosted zones".

Step 6: click "create hosted zone", and enter in your domain name.
Step 7: Select your domain name with the type "NS".
Step 8: Copy the 4 links in "value". (These are the name servers that you will enter into your namecheap name server. This will tell namecheap to use AWS for your name servers.)

Step 9: Go back to namecheap and click on "account" then "domain list" and select your domain name. Select your domain and go to "actions" then "DNS / host records".

Step 10: Select "Custom DNS", then paste in the 4 links you copied earlier in step 8. Make sure to take the "." off of the end. Ex. (ns-253.awsdns-31.com.) and change it to (ns-253.awsdns-31.com) The first link would go in "Nameserver 1" then the second in "Nameserver 2" and so on for all 4.

Step 11: Go back to AWS, go to "services" and search "S3", select your domain name, then click on "create bucket".

Step 12: Name your bucket with your domain name. Then select your region. Choose a region that is closest to you. Unselect "block all public access". Hit "create bucket".
Step 13: Click on your new bucket. Then click on "properties", and go to "static website hosting". Select "use this bucket to host a website". Enter in "index.html" into the index document. Then hit "save".

Step 14: Go back to "overview" and select "upload". Upload your own personal html, or you can use my template below. Make sure to name the file "index.html".

Step 15: Go to "permissions" then, "bucket policy", paste the following into the bucket policy. Make sure to put your domain name in the code where it says, "yourdomainname.com". Select "save".

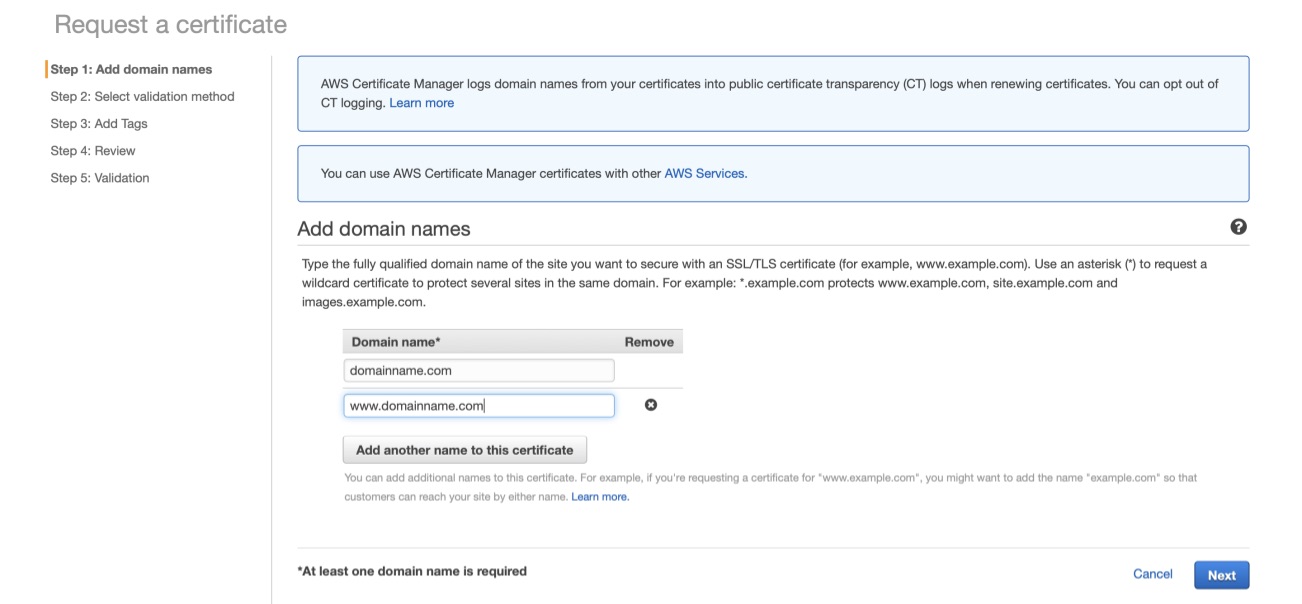
Step 16: Still on AWS, go to "services" and search "certificate manager". Then click "request a certificate". Keep "request a public certificate" selected.
Step 17: Enter into the "add domain name" the domain without the www and then select "add another name to this certificate" and type in the domain with the www. (For example "domain.com" and "www.domain.com") Then go to "next".

Step 18: select "DNS validation". And hit "next". (you dont have to do anything with the tags)
Step 19: select "confirm and request". Under the root domain, click the down arrow and choose "create record in route 53". Repeat for the second name (with www) and click "create record in route 53". Hit "continue" and wait about 5 minutes for the certificate to become validated for both DNS records. (You might have to reload the page to show that it is completed)
Step 20: On AWS go to "services" and search "cloudfront", select "create distribution", then select "get started" on the web distribution. Click in the "origin domain name" box and a drop down menu will appear. Select your domain name under "Amazon s3 buckets". Now scroll down and under Viewer Protocol Policy, choose "Redirect HTTP to HTTPS". Scroll down more and in the "alternate domain names CNAMES" box, type both the root domain and the www domain. For example "domain.com" and "www.domain.com"


Step 21: In "SSL certificate", select "Custom SSL certificate", then click in the box and in the drop down menu, select your domain name.

Step 22: Now go down to "Default root object", and enter "index.html". *Just ignore all the other settings, except the ones I have mentioned.

Step 23: Select "create distribution" and wait 10 to 20 minutes for the distribution to deploy. Keep refreshing until you see that the status is "deployed". Once it is deployed, copy the CloudFront domain name (it will look something like d12345678e.cloudfront.net)
Step 24: Go back to "services" and search for "route 53" again. Go under "DNS management" and select "hosted zones". Now click on your domain name and select "create record set". In the "name" box, just leave it blank because your domain will be in grey on the right already. (domainname.com) then select "yes" for alias, and in the "alias target" box, paste in the cloudfront domain name from step 23.

Step 25: Now create another record set but this time in "name", type in just "www" but don't add a "." because if you look to the right, it will already be there. (.domainname.com) Select for type, "CNAME", and paste the cloudfront domain name in the "alias target" box again.

You're all done! Good job. Now go type in your website and see if it works!!!